Serge van den Oever's weblog
XM Cloud rendering host options and fast local development with Experience Editor & Pages
Mon Nov 21 2022 • ☕️☕️☕️ 13 min read • you like my writing? Buy me a coffee

Changelog:
- 2022-11-21: First version
- 2023-01-28: Specific use of the term “editing host” where the front-end application is used for editing from Experience Editor and Pages. Clarification of what I mean by “internal editing host” (editing host running on XM Cloud environment) and “local editing host” (editing host running on your local machine as a Next.js development server).
In the stream of information about Sitecore headless you probably heard the term rendering host more than once.
The rendering host is the front-end application that consumes headless Sitecore data. This can be a website, but also an app. It is the head on headless Sitecore.
There is also a less heard term, the editing host. The editing host enables the editing experience for Sitecore headless so that the content and layout of pages can be done with components provided by the head. Currently, this editing host must be a website because the content and layout editors Experience Editor and Pages are browser-based editors. The following concept is key: Components provided by the head. You want to design your pages with components that are developed by the front-end team, and the rendering of the page during editing and preview is done by the website developed by the front-end team.
Development with the out-of-the-box internal editing host
When you create a project using the XM Cloud Deploy App, the project is set up with a default internal editing host as described in my blog post XM Cloud - first steps on building renderings with Next.js. This internal editing host runs out of the box on your XM Cloud environment.
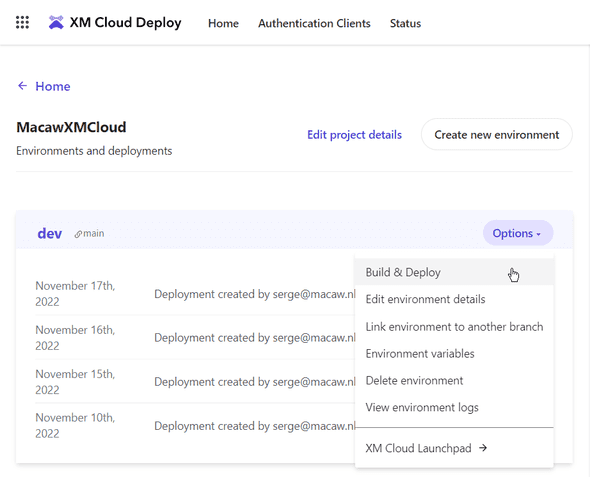
The code for the editing host and the components are in the sxastarter folder of the project scaffolded by XM Cloud - this is the front-end part of the default create SXA Headless project, which uses React.js, Next.js and TypeScript. Changes to the React.js components can be deployed to the out-of-the-box internal editing host by a code commit, and a Build & Deploy of the XM Cloud environment:
Important to know is that this out-of-the-box internal editing host only works with a Sitecore JavaScript Services (JSS) based website, and not with an ASP.NET built with the Sitecore ASP.NET Rendering SDK.
This process of code-change, commit, push, build, and deployment for using the internal out-of-the-box editing host is a lengthy process because both the editing host and the CM deployment are done, resulting in creating and deploying containers, and always a cold start of the complete environment. Therefore, using the internal editing host is currently not useful for a fast development cycle. Sitecore is working on decoupling editing Host builds/deployments from CM builds/deployments so that editing Host builds/deployments are fast and don’t require a cold start of the complete CM environment. But for a really fast development cycle in the editing host nothing can beat local development.
Local development with Docker containers
An option for a fast front-end development cycle is to do local development with Docker containers as described in my blog post Running the XM Cloud SXA Starter on your local machine. This works perfectly fine, and with npm run start:connected where changes in the source code are watched, a compilation is done instantly, and the changes are directly reflected in the Experience Editor through a reload. But there are also some disadvantages to this approach:
- For developers working on the head and doing for example React development, running Windows-based Docker containers is a lot of hassle, or maybe even impossible when you develop the front-end on a MacBook
- This workflow does work with the Experience Editor, but not with Pages - Pages can’t connect to a local environment running in Docker containers, as explained in my blog post The XM Cloud container - don’t fiddle (too much) with it…
Development with a custom external editing host
A custom external editing host is mandatory for a fast front-end development-cycle, or when a non-JSS-based editing host is used like for example ASP.NET.
How to configure this is described in the documentation: Walkthrough: Configuring external editing hosts for XM Cloud instances, where the XM Cloud CM configuration is modified with a patch file.
There is also a blog post Setting up an external XM Cloud Rendering Host to work with Experience Editor and Pages by Rob Earlam, who uses an ASP.NET editing host with the Sitecore ASP.NET Rendering SDK.
Both approaches need your editing host website to be deployed somewhere so it can be reached by the Experience Editor and Pages, and to configure the rendering host a full deployment to XM Cloud is required.
Local rendering host against Experience Edge, internal editing host for editing
NOTE: non-preferred approach
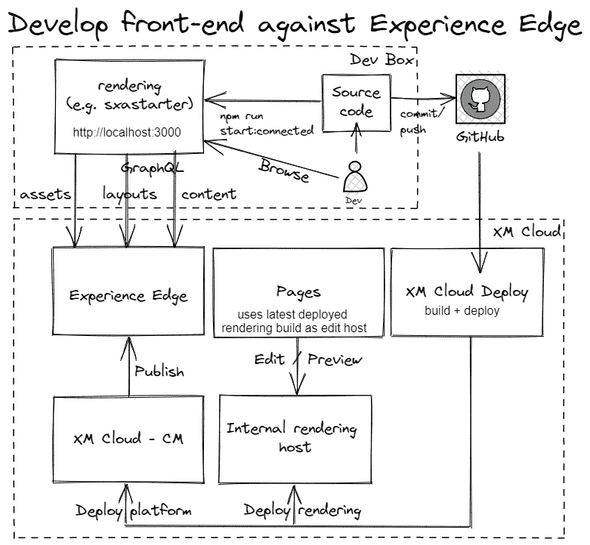
It is also possible to run your rendering host locally on http://localhost:3000, and use the out-of-the-box internal editing host OR an editing host deployed to Vercel for editing. This approach is explained in the video Frontend Developer Setup for XM Cloud in 5 minutes by Sebastian Winter, who describes how to configure local “head” development against Experience Edge by doing the following actions in the folder src/sxastarter. To achieve this we need to
- Copy
.envto.env.local -
Set the following values:
PUBLIC_URL=http://localhost:3000- we run the Next.js site on this address usingnpm run start:connectedSITECORE_API_KEY=xxxx- wherexxxxis the Edge token you can request with the scriptNew-EdgeToken.ps1JSS_APP_NAME="SergeFirst"- or your SXA site nameGRAPH_QL_ENDPOINT=https://edge.sitecorecloud.io/api/graphql/v1- this the Sitecore Experience Edge GraphQL endpointFETCH_WITH=GraphQL- we use GraphQL for fetching layout and dictionary dataDEBUG=sitecore-jss:*,-sitecore-jss:layout- to enable some debugging
- Run
npm install - Start the Next.js app in connected mode using
npm run start:connected
You first need to do a commit/push to GitHub, and run XM Cloud Deploy to deploy to the internal editing host OR deploy to Vercel, and have Vercel configured as the rendering host as Sebastian describes in his video Deploy your first Headless SXA site to Vercel.
This approach would not be my preferred development workflow when working on components you want to test in the Experience Editor or Pages, because in the front-end development workflow you want to see your changes instantly, instead of waiting for deployment.
Local editing host with direct connection to Experience Edge and Pages
What I really want to achieve is that I use my locally running editing host with the Next.js development server on my computer when I run npm run start:connected. This local editing host is accessible as a local server at http://localhost:3000.
Problem is that Experience Editor and Pages can’t access this local server unless you use a reverse proxy to make your local server accessible to the outside world.
There are multiple reverse proxy tools to do this like ngrok and localtunnel. We need to publish a local site with a port number to an external domain. With ngrok this is a paid feature, but with localtunnel this is free, so I will use localtunnel here.
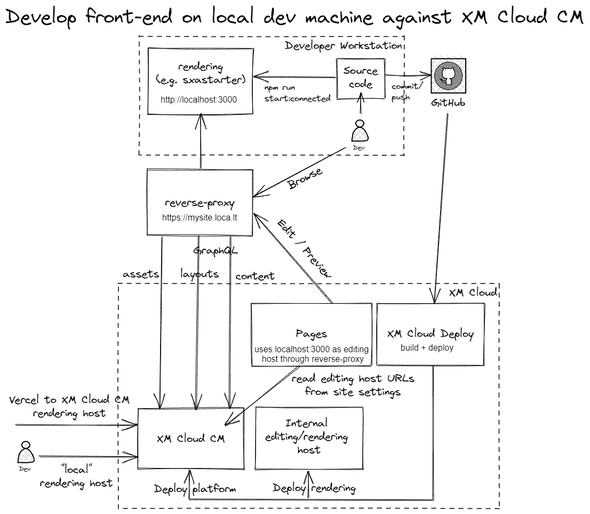
The setup that I am aiming for is the following:
We need some values for this configuration, I will explain how to obtain them:
SITECORE_API_HOST- open in XM Cloud the Content Editor, and take the base URL. In my case this is https://xmc-macaw-macawxmcloud-dev.sitecorecloud.io/JSS_EDIT_SECRET- open theshowconfig.aspxpage, in my case this is https://xmc-macaw-macawxmcloud-dev.sitecorecloud.io/sitecore/admin/showconfig.aspx, in the output search forJavaScriptServices.ViewEngine.Http.JssEditingSecretand take the valueSITECORE_API_KEY- this is the Item Id of Sitecore item/sitecore/system/Settings/Services/API Keys/xmcloudpreview(use the Content Editor)
You can now execute the following steps:
- In the Content Editor duplicate the rendering host configuration
xmcloudpreview(/sitecore/system/Settings/Services/Rendering Hosts/xmcloudpreview) twice, to<your site name>_internaland<your site name>_local, e.g.SergeFirst_internalandSergeFirst_local, and change their Application name toSergeFirst_internalandSergeFirst_local: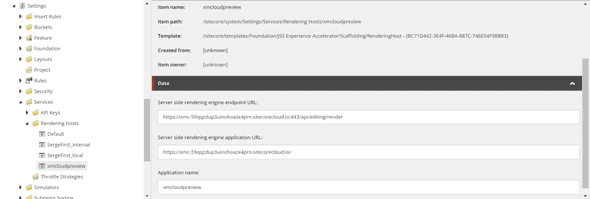
- Modify the domains of the Server side rendering engine endpoint URL and Server side rendering engine application URL fields in the new create
SergeFirst_localrendering host item to point to theloca.ltdomain (which we configure in the next steps):
- Install localtunnel globally with
npm install -g localtunnel -
Create a
.env.localfile with the following settings:SITECORE_API_HOST=https://xmc-macaw-macawxmcloud-dev.sitecorecloud.io/- URL of your CMJSS_APP_NAME="SergeFirst"- Name of your appPUBLIC_URL=https://xmc-59qqzdup3uinohoazx4prn.loca.lt- this is the external URL when we use localtunnel, your value will differJSS_EDITING_SECRET=**********SITECORE_API_KEY={********-****-****-****-********}
- Start your local rendering host in the folder
src/sxastarter, e.g.npm run start:connected - To keep things simple we run localtunnel with a subdomain that is the same name as your internal rendering host, in my case
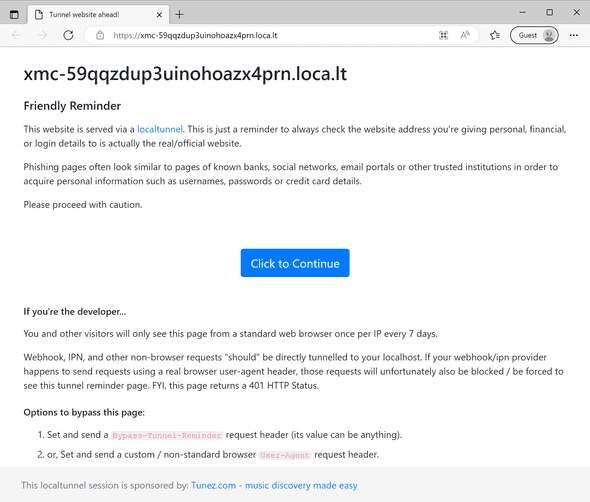
lt --port 3000 --subdomain xmc-59qqzdup3uinohoazx4prn- this results in an externally accessible site proxying to http://localhost:3000 with the URL https://xmc-59qqzdup3uinohoazx4prn.loca.lt - Open the site, in my case https://xmc-59qqzdup3uinohoazx4prn.loca.lt - it can be that there is a Click to Continue button you need to click first. When not clicked a blank page will be shown Experience Editor and Pages:
- In the Content Editor we can now switch between the internal rendering host configuration and the local rendering host configuration on the
Site Groupingsettings of your site: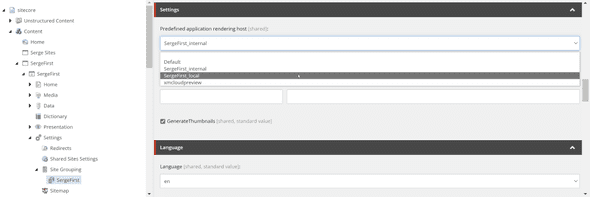
When needed additional rendering host configurations can be added as well like for example a Vercel-deployed rendering host.
Note that if localtunnel is not running anymore, an error is given in Experience Editor and Pages:
Fixing the rootItemId error
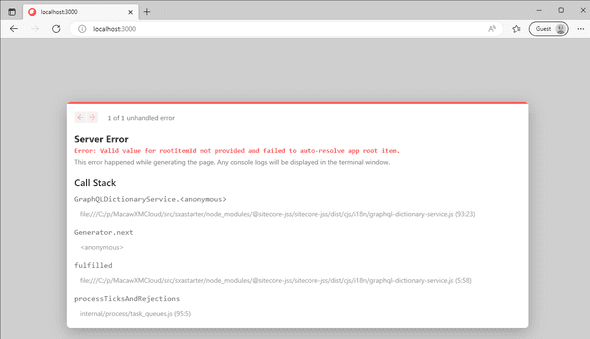
When you open https://xmc-59qqzdup3uinohoazx4prn.loca.lt you will see the following error:
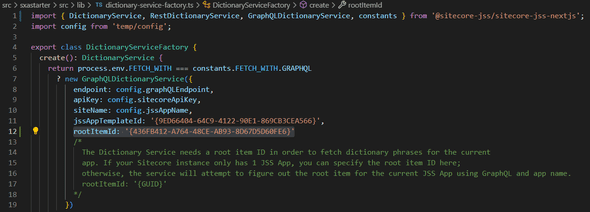
As described in my blog post Running the XM Cloud SXA Starter on your local machine we need to make a change to the file src\lib\dictionary-service-factory.ts to use the GUID of the template ID of the home item of your JSS app:
So the code will look like this:
Fixing the missing CDP_CLIENT_KEY issue
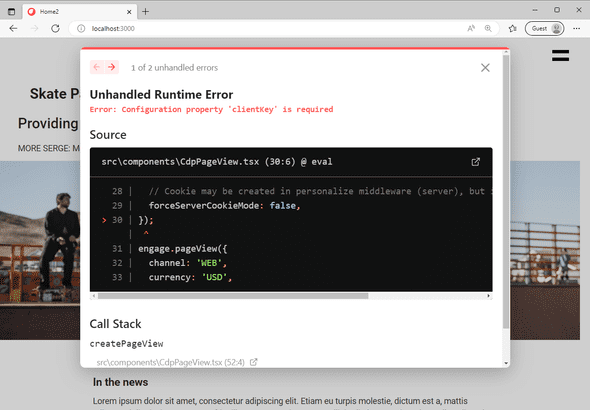
NOTA BENE: See the UPDATE at the end of this section for retrieving the required settings.Next, you will be greeted with the following error:
This issue can be solved by setting the NEXT_PUBLIC_CDP_TARGET_URL and NEXT_PUBLIC_CDP_CLIENT_KEY environment variables as well, but as described in the Sitecore documentation The Next.js Personalize add-on you need to make a request to Sitecore Support for XM Cloud Personalize Environment Variables. Include the site name in your request.
In my blog post Running the XM Cloud SXA Starter on your local machine I work arround this issue by changing the source code for the CdpPageView component in src/Scripts.tsx and commenting out the CdpPageView components (run npm run lint to see if code formatted correctly):
Commenting out the CdpPageView component is not a very sustainable solution, but good enough to get it working as long as the XM Cloud Personalize Environment Variables variables are not known yet.
UPDATE:
If you open Pages, press F-12 for the developer tools, and filter the network tab on create.json you will see:
In the screenshot, you will see that the required client key is visible.
in env.local set:
NEXT_PUBLIC_CDP_TARGET_URL=https://api.boxever.comSITECORE_API_KEY=****************- the value ofclient_key
Now you can revert the changes to src/Scripts.tsx.
Testing the local editing host
If you selected the local editing host configuration (e.g. SergeFirst_local) and open the Experience Editor or Pages, you will see the locally running editing host in action! Note that changes to components are directly reflected in both the Experience Editor and Pages, and that they both automatically reload their page.
When the localtunnel is stopped you will see an error in the Experience Editor or Pages. Change the selected predefined application rendering host of the Site Groupings settings of your site back to the internal rendering host and you will use the out-of-the-box internal editing host again.
I would like to thank Andy Cohen and Sebastian Winter from Sitecore for their help in getting this setup working.
Discuss on Twitter • Edit on GitHub
This work is licensed under a Creative Commons Attribution-NonCommercial 4.0 International License. You are free to share and adapt this work for non-commercial purposes, provided you give appropriate credit, provide a link to the license, and indicate if changes were made. To view a copy of this license, visit http://creativecommons.org/licenses/by-nc/4.0/.
Serge van den Oever's weblog

Personal blog by Serge van den Oever - als je maar lol hebt...
X: @svdoever
LinkedIn: Serge van den Oever - articles on LinkedIn
GitHub: svdoever
Technology Consultant @ Macaw
2021-2024 Sitecore Technology MVP
